


Here's how!
In the previous installment of Building a Better Mancave, we destroyed a couple of myths about having a decent hobby area. So now we can start on building.
Build a Better Mancave: Budget/Dorm Option
To kick off the proper building a better mancave series, the articles will start from the smallest and cheapest and build from there. If you're new to the hobby, you can follow along and upgrade as you go.
The Budget / Dorm Setup as I call it is the perfect setup for the baller on a budget, or the baller with limited space.
As I've mentioned it before, when I started my painting business, that was the setup I had. Despite being quite minimalist, it get's the job done.
This setup, because it's space efficient, is perfect if you don't want to commit a whole desk to it, or if all you have if mom's kitchen table that you can't afford to destroy by spilling stuff on.
Here's what you'll need:
2 Large-ish boxes, with lids.
That is it.

Well ok, it might sounds like a blatant lie, of course you need a couple more things, but you should already have all you need in the house/dorm.
So stuff you'll need besides, the box that is:
A place to sit down - your bed, a couch, a computer chair, whatevs.
A light of some sort - Either the one on the ceiling, a desk lamp, or good ol' natty sun if you have a window handy and only paint by day.
Now correct me if I'm wrong, but even the ghetto-est of living accommodations should have those.
Now how do you use your stuff.
Box 1 is for bits and sprues, and stuff you don't really need on the regular that you pickup as your hobby collection grows. It's for easy storage only, there is no hidden purpose or secret technique here, you just need the store things away in one convenient area. This setup is great, but not suited for airbrush use. The weapon of choice for this type of setup would be shaker cans, that you can put away in Box 1 when you are not starting a project.
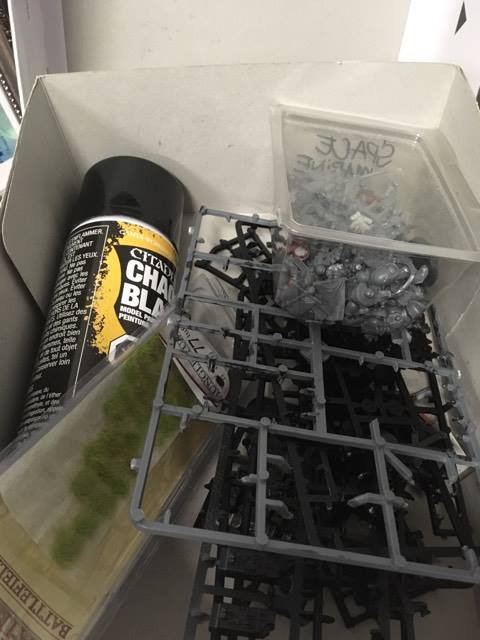
That area is box one. One trick is to remove as many sprues as possible to keep only the bits, as you will make the most out of that box and keep your space minimal.
Box 2 is where the magic happens.
Starter sets from whatever games you play are usually perfect size and shape for this.

The box itself is our painting area. You can tape a bag on the bottom to use as a palette, it can store the 12 pots of paint you need for most projects and it can rest suitably well on your lap.
The lid of Box 2 is the assembly area. Because assembly is a messy affair, it's separate from the painting area. Having all your mold line and flash residue fall in a little box that you can then dump in the trash takes care of all the mess for you. And because we're using the lid, you can insert your painting area in it when you are not assembling.

Now when you are done for the day, close or stack Box 2 on it's lid and put it away neatly under a bed, in a drawer, or at the top of a closet/fridge where you keep Box 1, ready to get on with painting at a moment's notice.
Hobby smart, not hard.
So until next time,
No excuses, hobby like a champion!
No comments:
Post a Comment
Note: Only a member of this blog may post a comment.